Standard Config Files
Standard Config Files replace the need to manually program modems so the information below is left for informational purposes only.
Between Standard Config Files and USS Care, this is how we manage modems.
Standard VDSL PPPoE Internet, IPTV, and MER
The software is similar for both Comtrend and Smart RG modems.
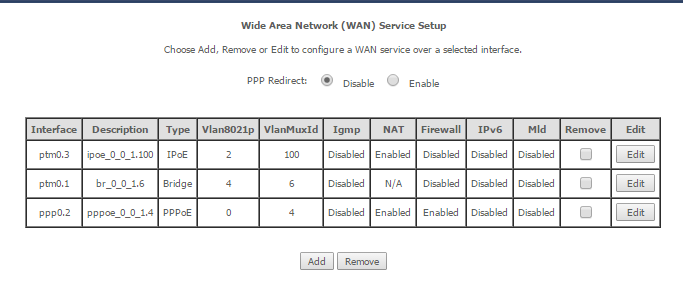
Click Advanced Setup and then WAN Service. Above is the proper WAN Service Setup for MER, PPPoE Internet and IPTV.
- The first row is set up as IPoE on VLAN 100 and allows MER remote access to the modem from the Hay Office
- The second row is in Bridge mode on VLAN 6 and Priority 4 for IPTV
- The third row is set up for PPPoE on VLAN 4 and Priority 0
If a customer does not have either Internet or IPTV the service can be removed.
Interface Grouping
Click Advanced Setup and then Interface Grouping. On average IPTV will be set up for LAN Ports 3 and 4
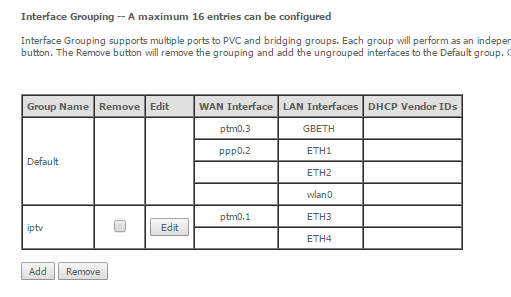
If a 5374 is factory reset it will have these WAN Services and Interface Grouping settings in most cases. If the customer doesn’t have IPTV the Interface Group for IPTV can be removed.
Adding A Missing Wan Service
In some cases a WAN Service may be missing. For example below the IPTV WAN Service is not there.
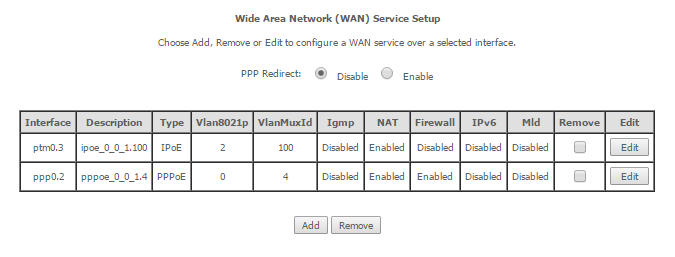
Click Advanced Setup and then WAN Service. You can add a missing WAN Service by clicking the Add button. From there make sure the PTM interface is selected (ie: ptm0/(0_0_1))and click Next.
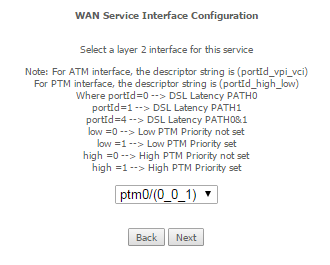
On the next screen we complete the WAN Service Configuration.
For IPTV WAN Service we would fill it out like this:
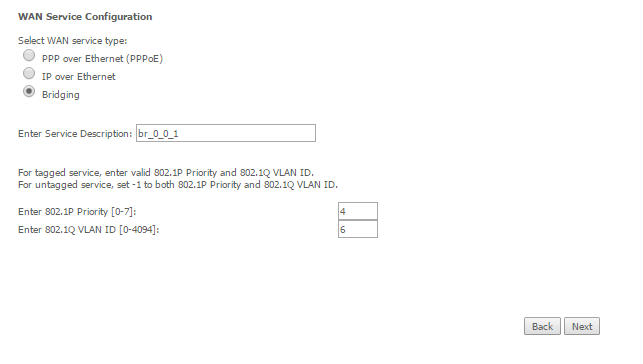
After you’ve entered the above information to add the IPTV WAN Service simply click Next and then Apply/Save.
We now need to set up the Interface Grouping for IPTV.
Click Advanced Setup and then Interface Grouping. Then click Add.
Call the Group Name IPTV.
Move the Bridged Mode PTM Interface (ie: br_0_0_1.6/ptm0.1) to the left side to Grouped WAN Interface.
Also move the ETH ports you need, usually ETH3 and ETH4, to the left side to Grouped LAN Interfaces.
Click Apply/Save.

Next we need to set the newly created Interface Group’s IGMP settings. Click Advanced Setup and then LAN. From the dropdown menu at the top of the page, select the newly created IPTV Interface GroupName.
Change the IGMP Snooping mode to Standard Mode. Click Apply/Save.
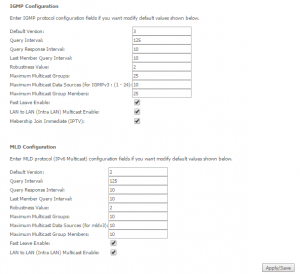
Last but not least, click Advanced Setup and then Multicast. Check all of the boxes on the screen and click Apply/Save.
For PPPoE Wan Service we would fill it out like this:
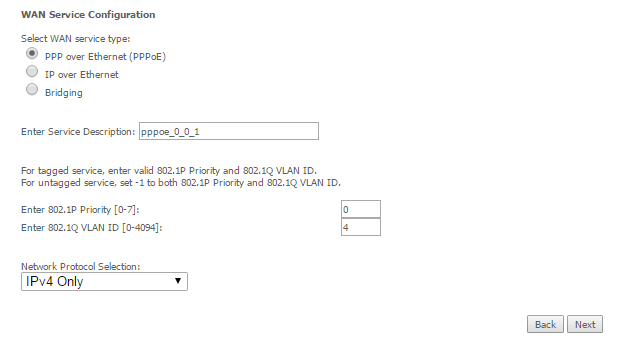
Click Next after you have entered the proper info. Now enter the PPP Username and PPP Password. Be sure Enable NAT, Enable Firewall, and Fixed MTU with MTU: 1492 are all set.
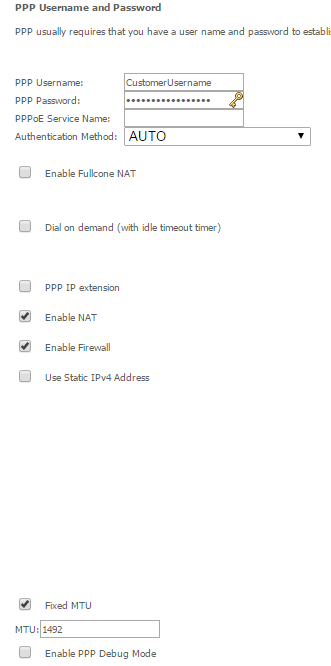
Once this is all entered, click Next.
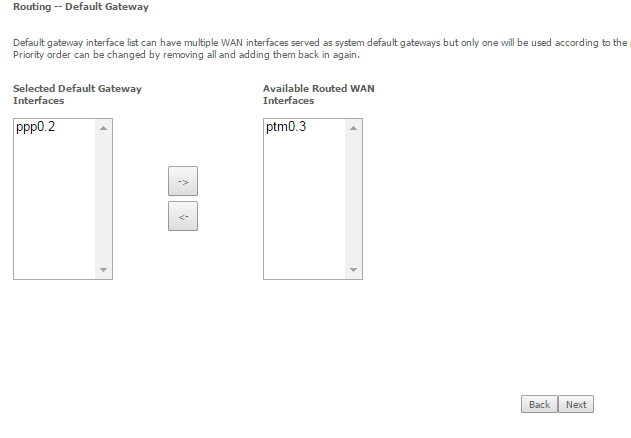
On the Routing — Default Gateway screen be sure the PPP interface is on the left and the PTM interface is on the right and click Next.
On the DNS Server Configuration screen please be sure the PPP interface is on the left and the PTM interface is on the right so it looks similar to the image above and click Next.
Adjust Wireless Settings
Click Wireless. On the Basic page update to the desired SSID and hit Apply/Save.
Click Wireless and then Security. In most cases set up WPA2-PSK and enter the desired passphrase/key/password. Click Apply/Save. Click the Click here to display link to be sure the password saved.
Click Wireless and then Advanced. Generally it should be set on Auto Channel. Most other settings here are fine at the defaults. This is where the modem indicates any wireless interference. It may say something like “Current: 6 (interference: acceptable)” or “Current: 6 (interference: severe)”.
If interference is severe click Site Survey as it may help indicate nearby WiFi networks and the channels it broadcasts on. From here you could try setting a specific channel under the Advanced link if necessary.